Git + RStudio Tutorial
Imagine you have a piece of code, and you’re keen on tracking its changes without losing the original version. The conventional method involves saving scripts as new files, often labeled with indicators like ‘v0’ or a timestamp. Git offers a more seamless way to version your code without the hassle of managing different version files manually. It not only tracks changes made to your files but also equips you with tools to document those changes.

1. Git vs GitHub
Git is a version control system that runs locally on your computer. It tracks changes to files over time, allows you to document those changes, and lets you return to any previous version of your project. Git works completely offline.
GitHub is an online platforms that host Git repositories. They allow you to store your project remotely, collaborate with others, and access your work from anywhere.
Several platforms provide Git hosting:
| Platform | Owner / Country |
|---|---|
| GitHub | Microsoft, USA |
| GitLab | GitLab Inc., USA |
| Bitbucket | Atlassian, Australia |
| Codeberg | Codeberg e.V., Germany |
The University of Amsterdam provides a self-hosted GitLab instance, allowing you to keep data within institutional infrastructure. You can sign up here
Features of Git platforms
GitHub and GitLab extend Git with additional features:
| Feature | Description |
|---|---|
| Backup | Your project is stored remotely, keeping it safe even if your local machine fails. |
| Collaboration | Sharing, viewing, and editing repositories with collaborators. |
| Issue tracking | Track bugs, feature requests, and tasks. Keep track of changes that still need to be implemented |
| Software distribution | For example, R packages can be installed directly from a Git repository. |
| Website hosting | Host static websites for documentation, tutorials, or reports. |
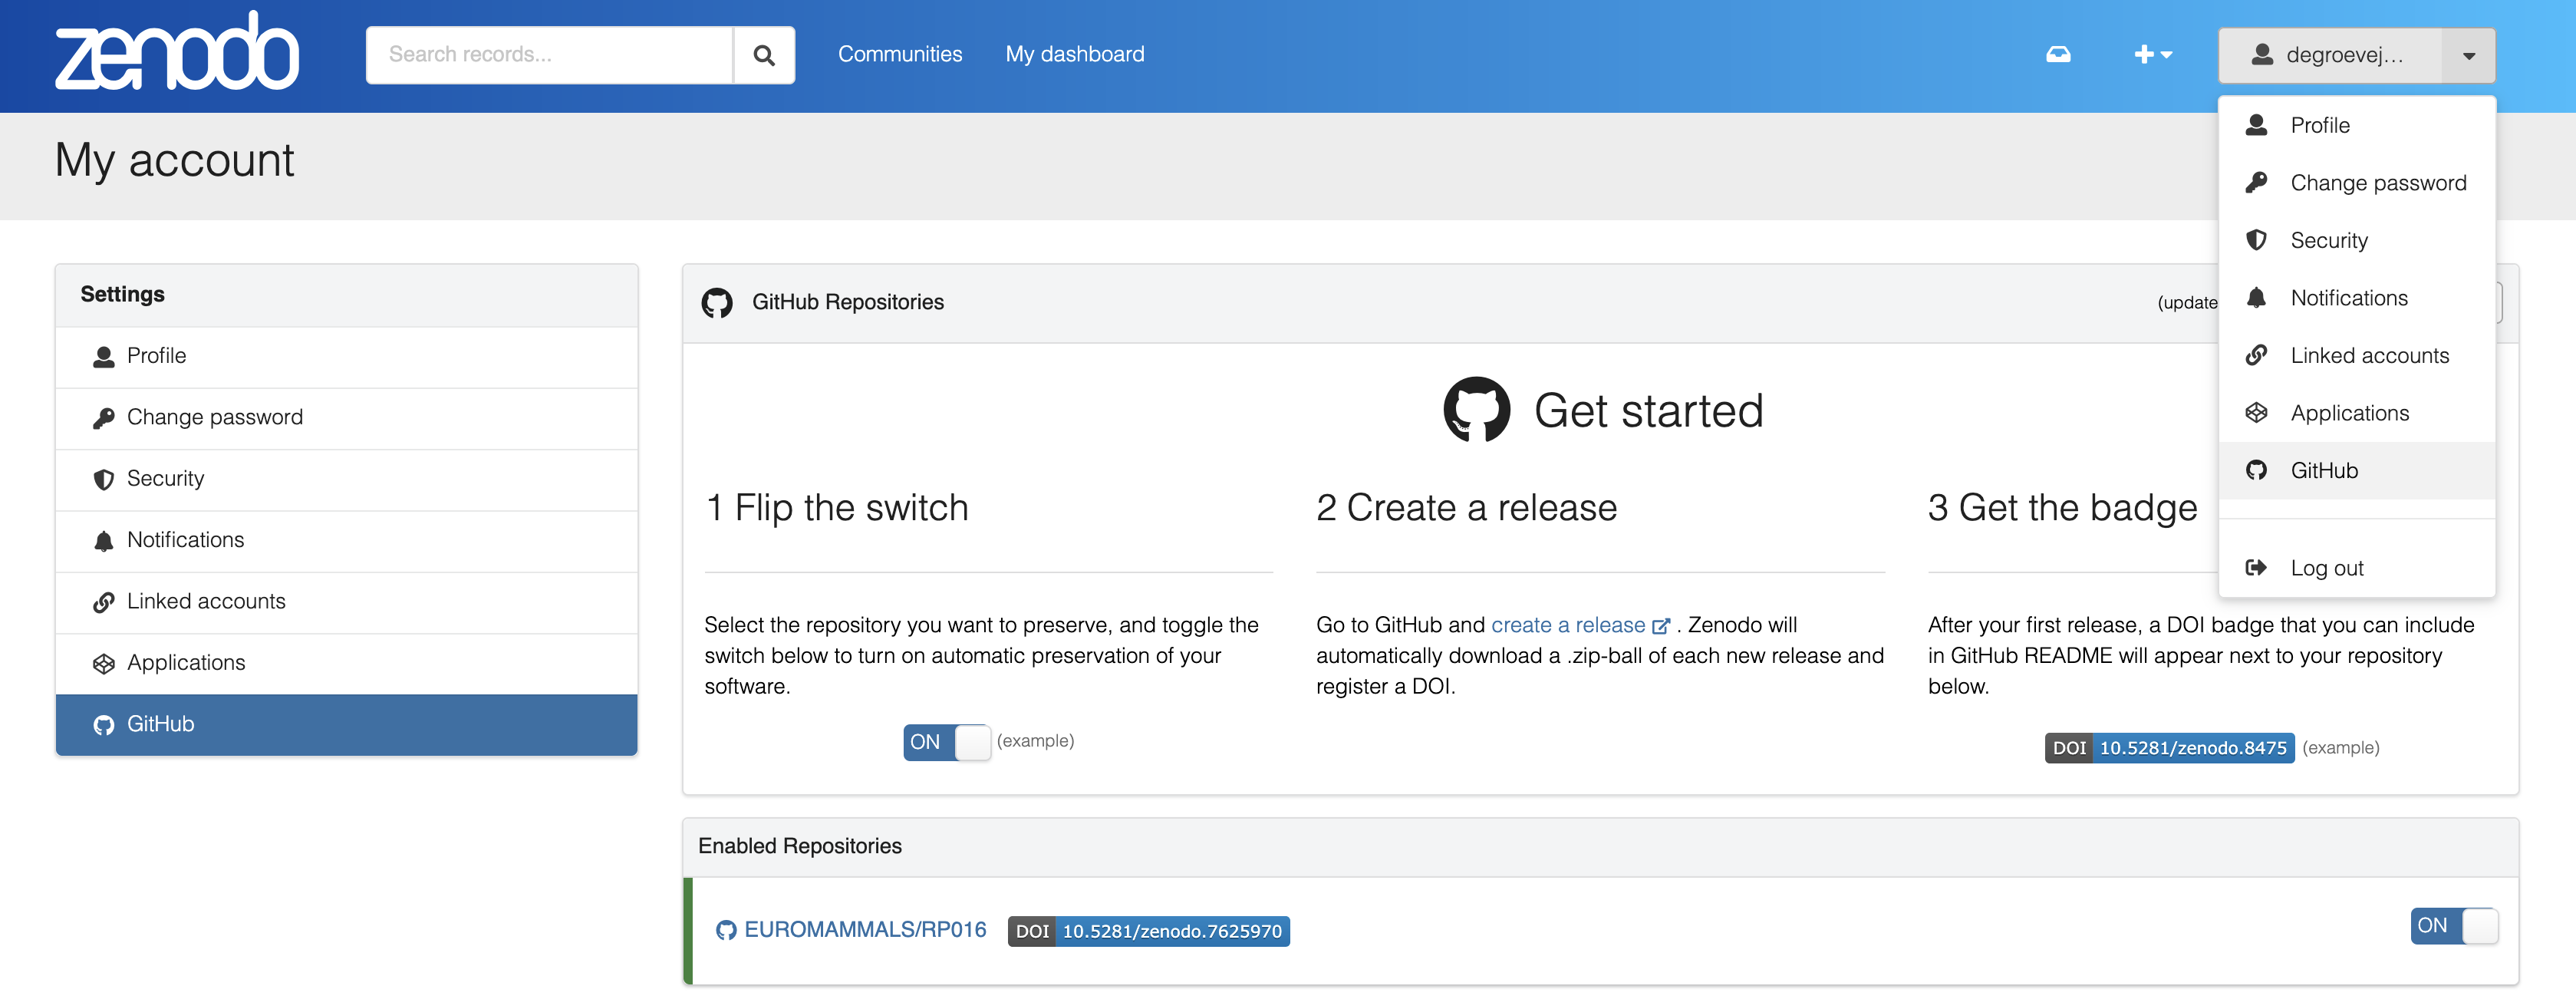
| Zenodo / Figshare integration | Archive releases and obtain a citable DOI. |
2. Git platforms vs Data Repositories
Git platforms (like GitHub or GitLab) and data repositories (like Zenodo or Figshare) serve different roles, but are often used interchangeably in research.
Git platforms are used for active development: it is best suited for code, documents, and small datasets that change over time, allowing you to track changes, collaborate with others, and update your work frequently.
Data repositories are used for archiving: they store final versions of data and code, support large or static datasets, and provide long-term preservation through citable DOIs.
The recommended workflow for reproducible research is to develop on GitHub/GitLab throughout the project, then archive a release on Zenodo/Figshare when submitting a paper. Cite the Zenodo/Figshare DOI in your paper, not the GitHub/GitLab URL, because GitHub URLs are not guaranteed to be stable.
Exercise: Which Tool Should You Use?
For each situation below, choose the most appropriate tool from the drop-down. Correct answers turn green.
| Situation | Recommended tool | |
|---|---|---|
| Writing and versioning R scripts | ||
| Collaborating on code with a colleague | ||
| Storing large raw sensor / sequencing datasets | ||
| Depositing data alongside a journal submission | ||
| Obtaining a citable DOI for your analysis | ||
| Distributing an R package for others to install | ||
| Hosting a project website or documentation |
3. Setup
If everything went well we are all set for using git in rstudio by following the following instruction manual: rstudio git setup
4. Git Vocabulary
- Repository (repo): The project folder + full history.
- Remote: The online copy (e.g., GitHub, GitLab).
- Commit: A snapshot of changes in your repository with a message.
- Stage: Select files you want to include in a commit.
- Push: Upload your local commits to the online repo.
- Pull: Download commits from the online repo.
- Branch: A parallel workspace for isolated development.
- Merge: Combining that workspace back into the main project.
- Merge conflict: When Git can’t auto-merge differences.
5. Creating a Project with Git
Start a New Project with Git (option 1)
With this option git is enabled. However, git is just used locally.
- File > New Project
- Choose New Directory > New Project
- Check Create a git repository
Clone an Existing Remote Repository (option 2)
With this option git is enabled and able to interact with the remote.
- Create a repository in GitHub / GitLab
- Copy the repo URL
- In RStudio: File > New Project > Version Control > Git
- Paste the repo URL
- Select a local location and click Create Project
Exercise 1: Create Your First Repository
- Create an empty remote git repository (GitHub / GitLab).
- Clone the repository locally (option 2)
6. Basic Git Workflow
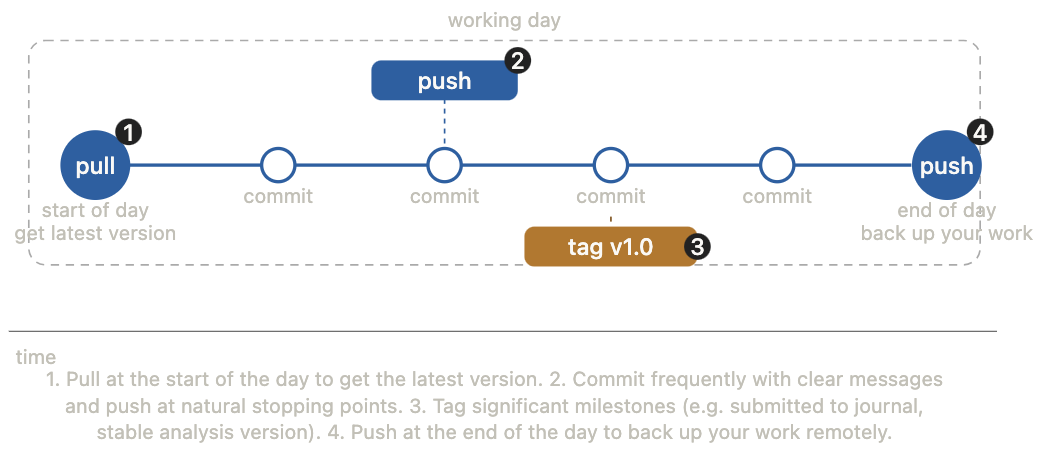
Now that we have a git setup for a project we can learn how versioning with git works. The basic workflow consists out of four steps:
pull → stage → commit → push.
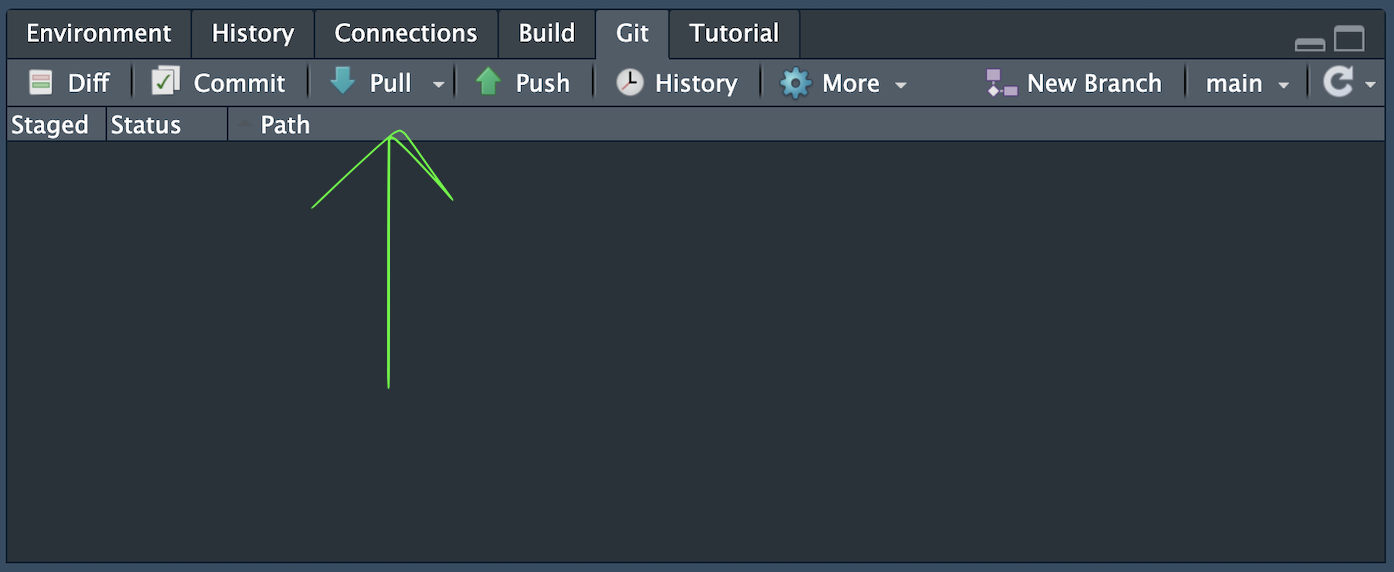
Pull
Click Pull in RStudio to ensure your local files are up‑to‑date. Pull downloads the latest commits from the repo.
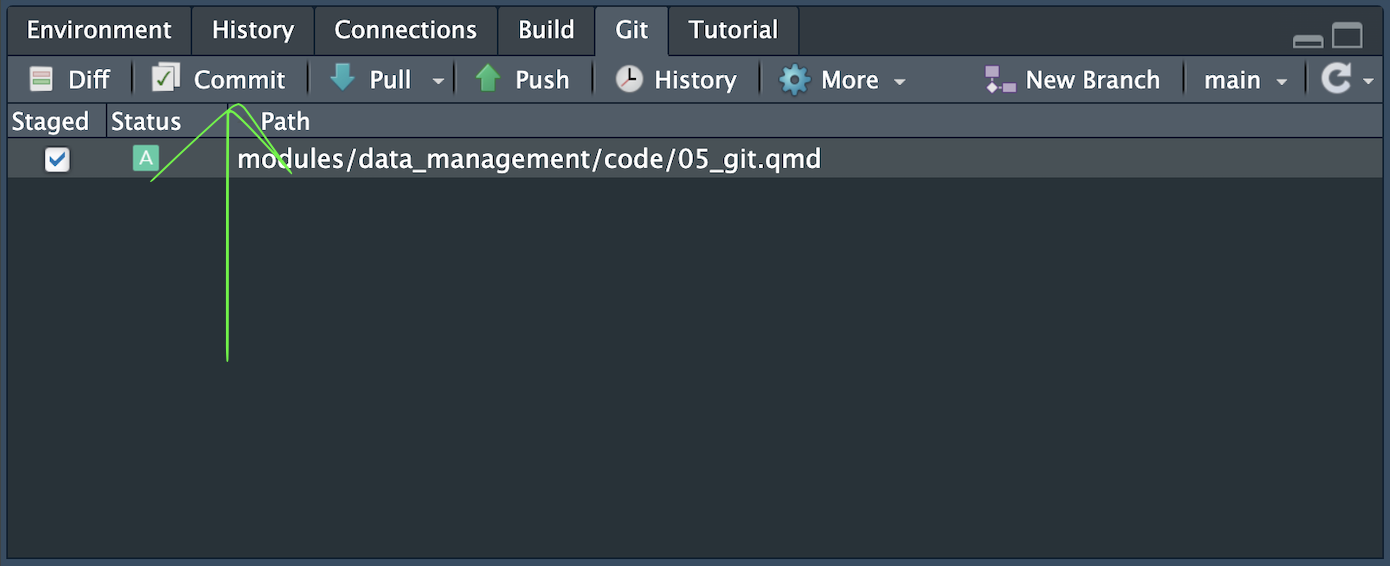
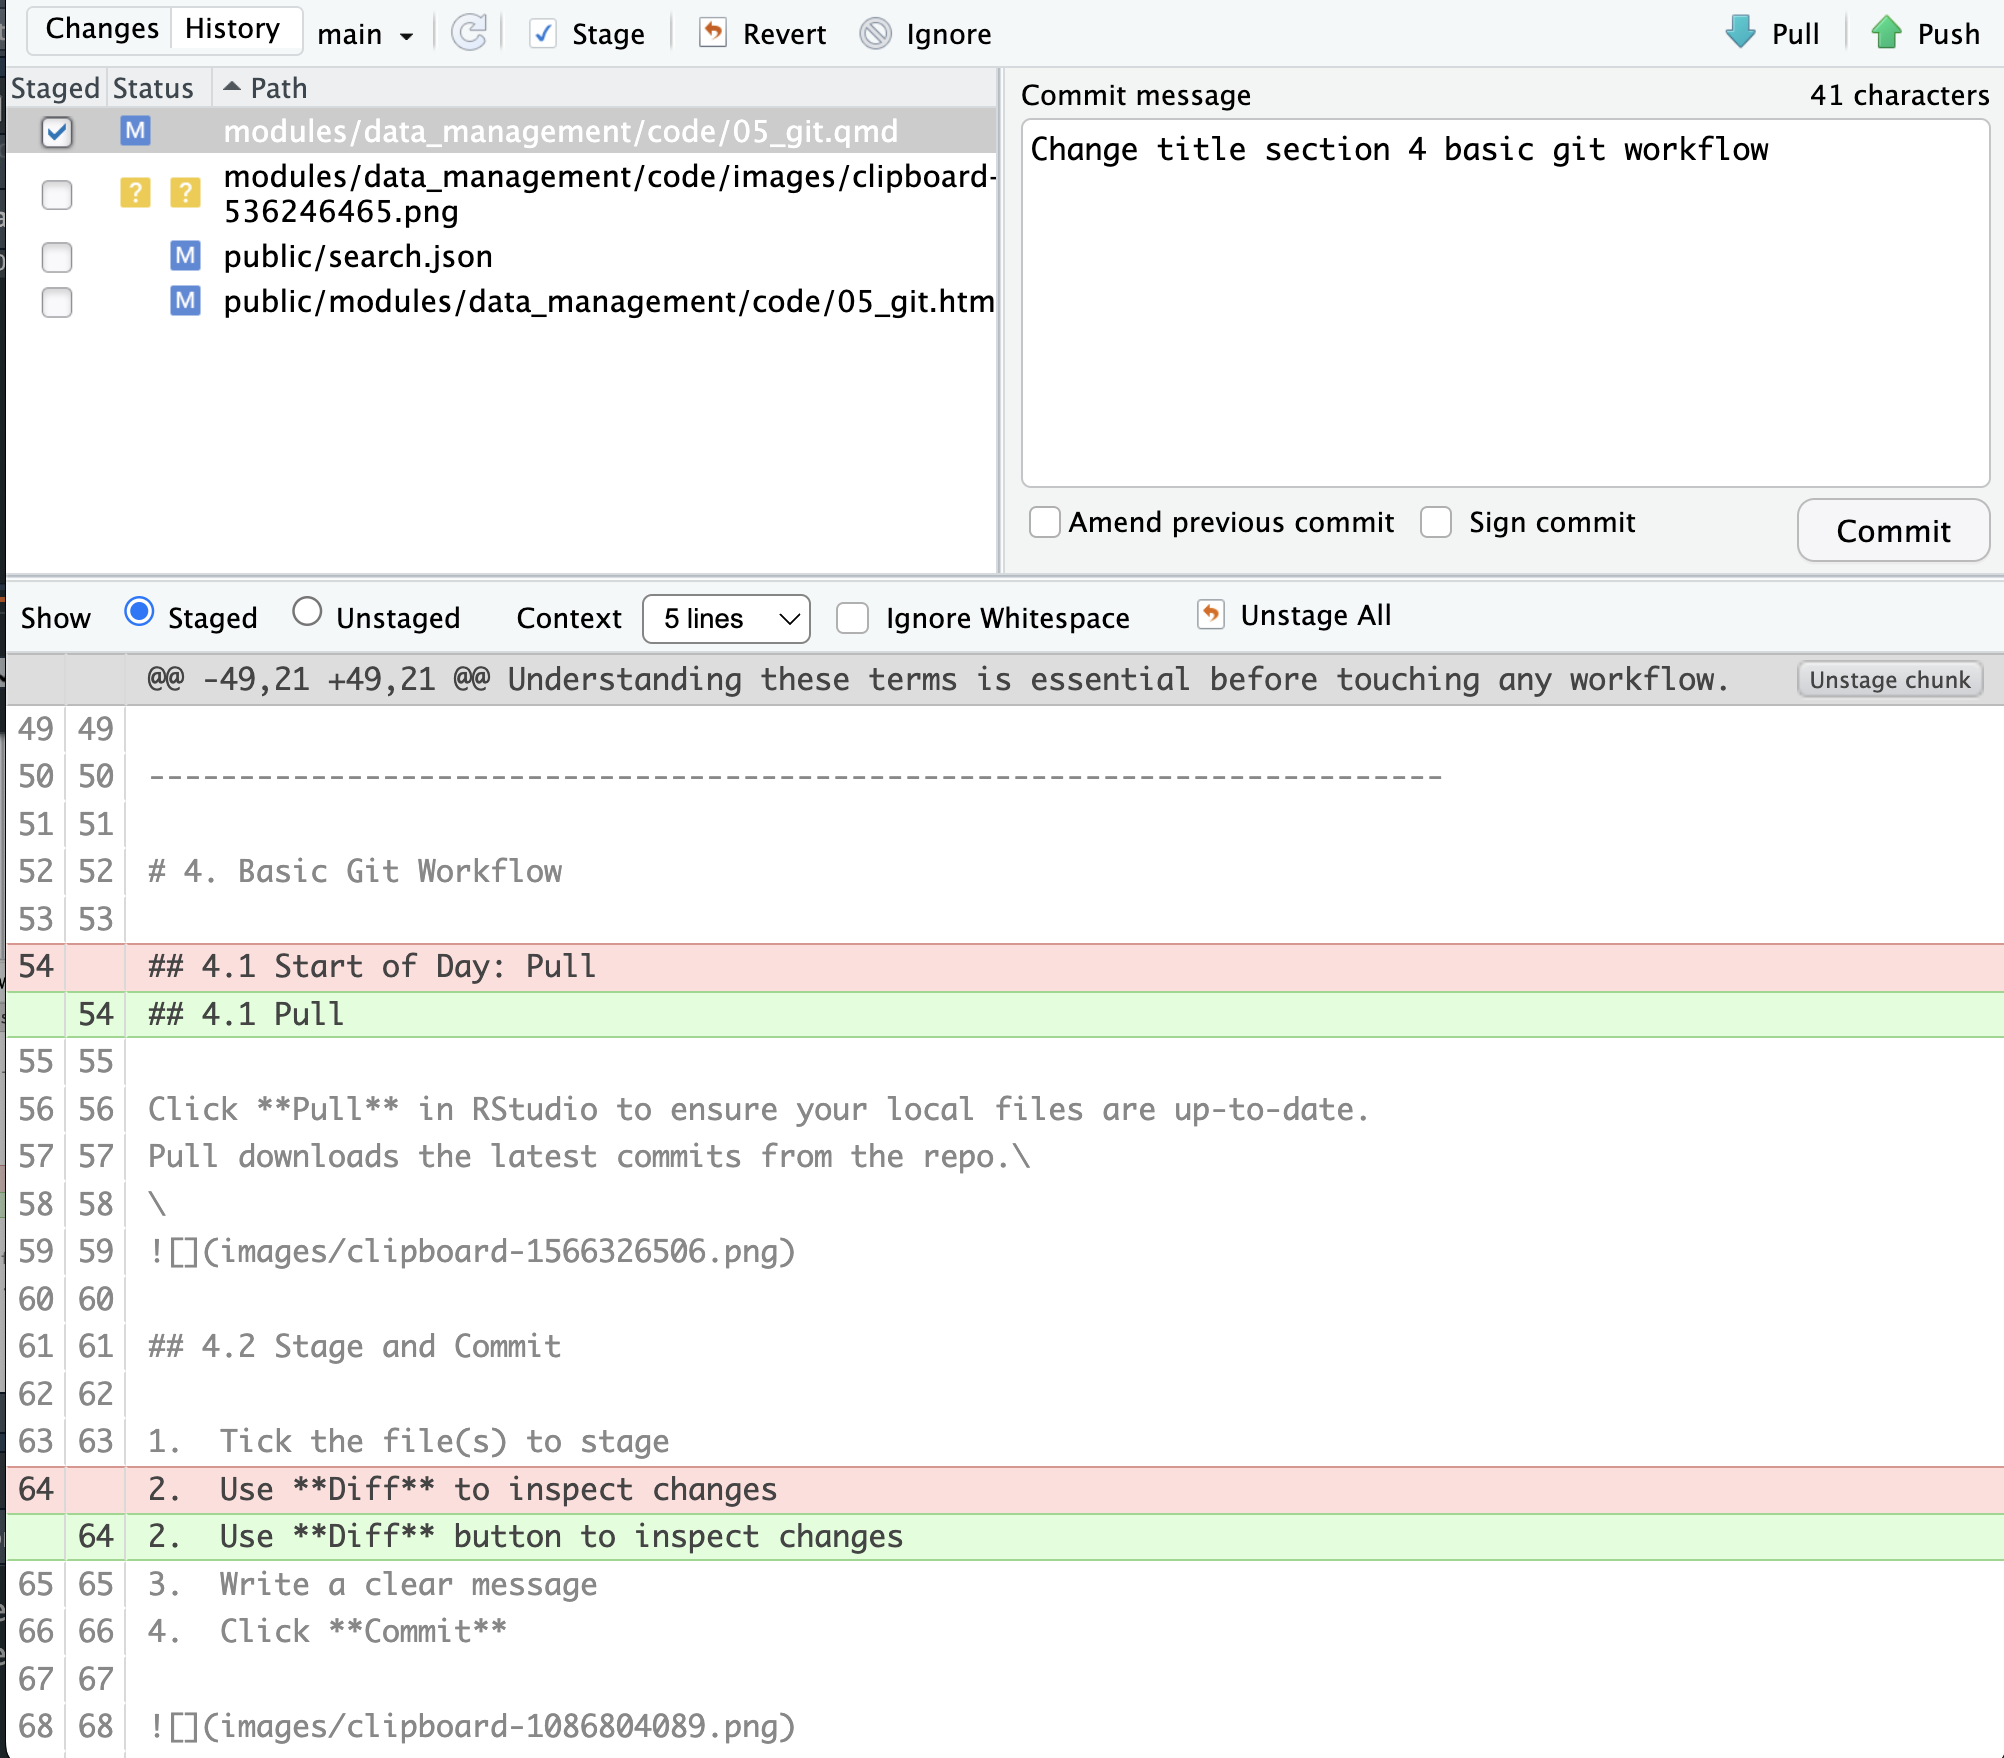
Stage and Commit
- Tick the file(s) to stage
- Use Diff button to inspect changes
- Write a clear message
- Click Commit
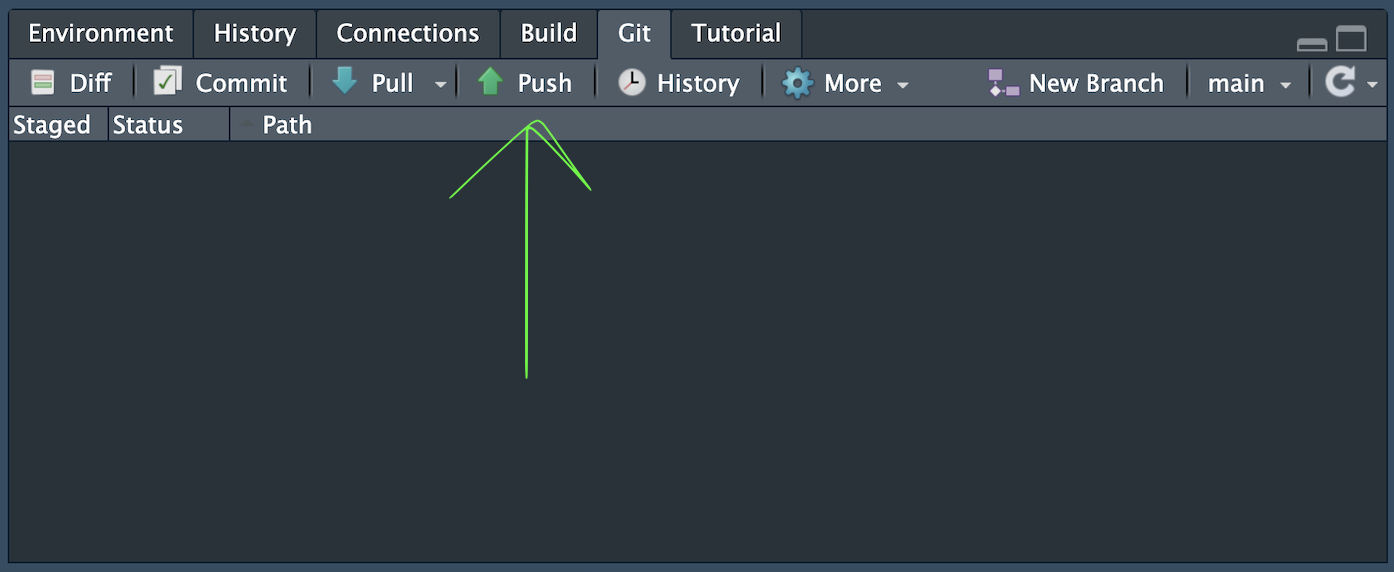
Push
Send your commits to the remote repository.

Exercise 2: Create Your First Commit
- Open your previously created git-enabled project.
- Create a
codedirectory and add a quarto document named00_data_preparation.qmd(File > New File > Quarto Document). - Create a
datadirectory. - Stage → Commit → Push the new quarto document.
- Go to GitHub / GitLab and check the history.
Goal: See your commit appear on GitHub / GitLab.
Exercise 3: Make Multiple Commits
- Create, if not exist, a README.md in the root of the directory.
- Add the following section titles in the README.md:
# introduction
# directory structure
# data and code description
# usage
- Commit with a meaningful description of the change.
- Add a placeholder text in the subsection “introduction”.
- Commit with a meaningful description of the change.
- Add a placeholder table in the subsection “data and code description”.
- Commit with a meaningful description of the change.
- Add an image in the subsection “introduction”.
- Commit with a meaningful description of the change.
- Push
- Go to GitHub / GitLab and check the history.
Goal: Familiarise with commit → push. Learn that multiple commits can be made before changes are pushed.
Exercise 4: View History Online
- Go to GitHub / GitLab → Commits tab.
- Inspect messages and diffs.
- Click the directory / folder icon on the right to explore the repository at different commits.

Goal: Understand how your work appears remotely. Understand that you have a complete snapshot of your repository for every commit.
7. The .gitignore file
The .gitignore file tells Git which files should not be tracked or shared (e.g. sensitive information, large or unnecessary files). The file is by default created at the root of the project directory.
Case study: Protecting secrets
It might happen that you need to access external or private data repositories or databases with credentials. If that is the case, never save your credentials (passwords, credentials, API keys) in your R scripts. Instead, you can create a config.yml file in the root directory.
default:
  database1:
    driver: 'RPostgres::Postgres()'
    server: 'server.address.com'
    uid: 'username'
    pwd: 'password'
    port: 5432
  APIKEY:
    key: 'api-key'
    url: 'api.access.point.com'
Then, add the config.yml to .gitignore. This ensures that credentials are not shared in scripts and not committed to GitHub / GitLab. Navigate to .gitignore at the root of your project directory and add:
config.yml
.Renviron
To call the configurations in an R script use the config::get() function.
config::get()
db_credentials <- config::get('database1')
uid <- db_credentials$uid # username
pwd <- db_credentials$pw # password
Exercise 5: add sensitive files to .gitignore
- Create the above
config.ymlfile in the root of the project directory. - Check the Git pane and see if the
config.ymlfile appears. - Edit the
.gitignorefile by addingconfig.ymland save the changes. - Verify that
config.ymldisappears from the Git pane. - Commit the changes
- Add the following section to
00_data_preparation.
config::get()
db_credentials <- config::get('database1')
uid <- db_credentials$uid # username
pwd <- db_credentials$pw # password- Commit the changes
Goal: Learn how to keep credentials out of Git. Learn how to use .gitignore.
8. Version history
Git’s ability to inspect and recover older versions is one of its most powerful features. Let’s explore!
Viewing the project history
Every commit is a complete snapshot of the repository at that moment. You can explore the entire history using:
- GitHub → Commits tab
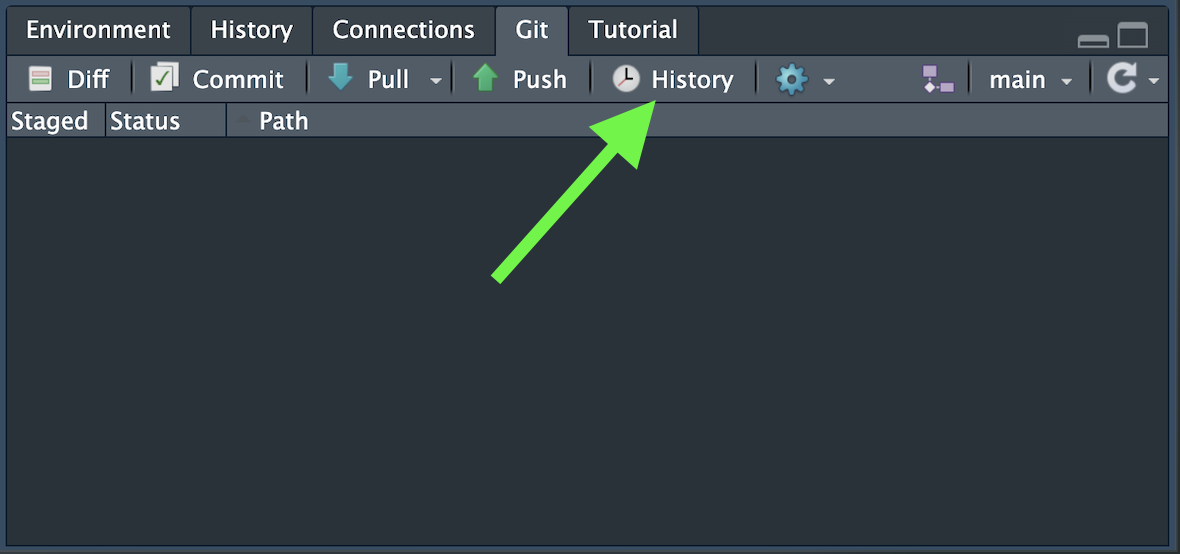
- RStudio → Git pane → History
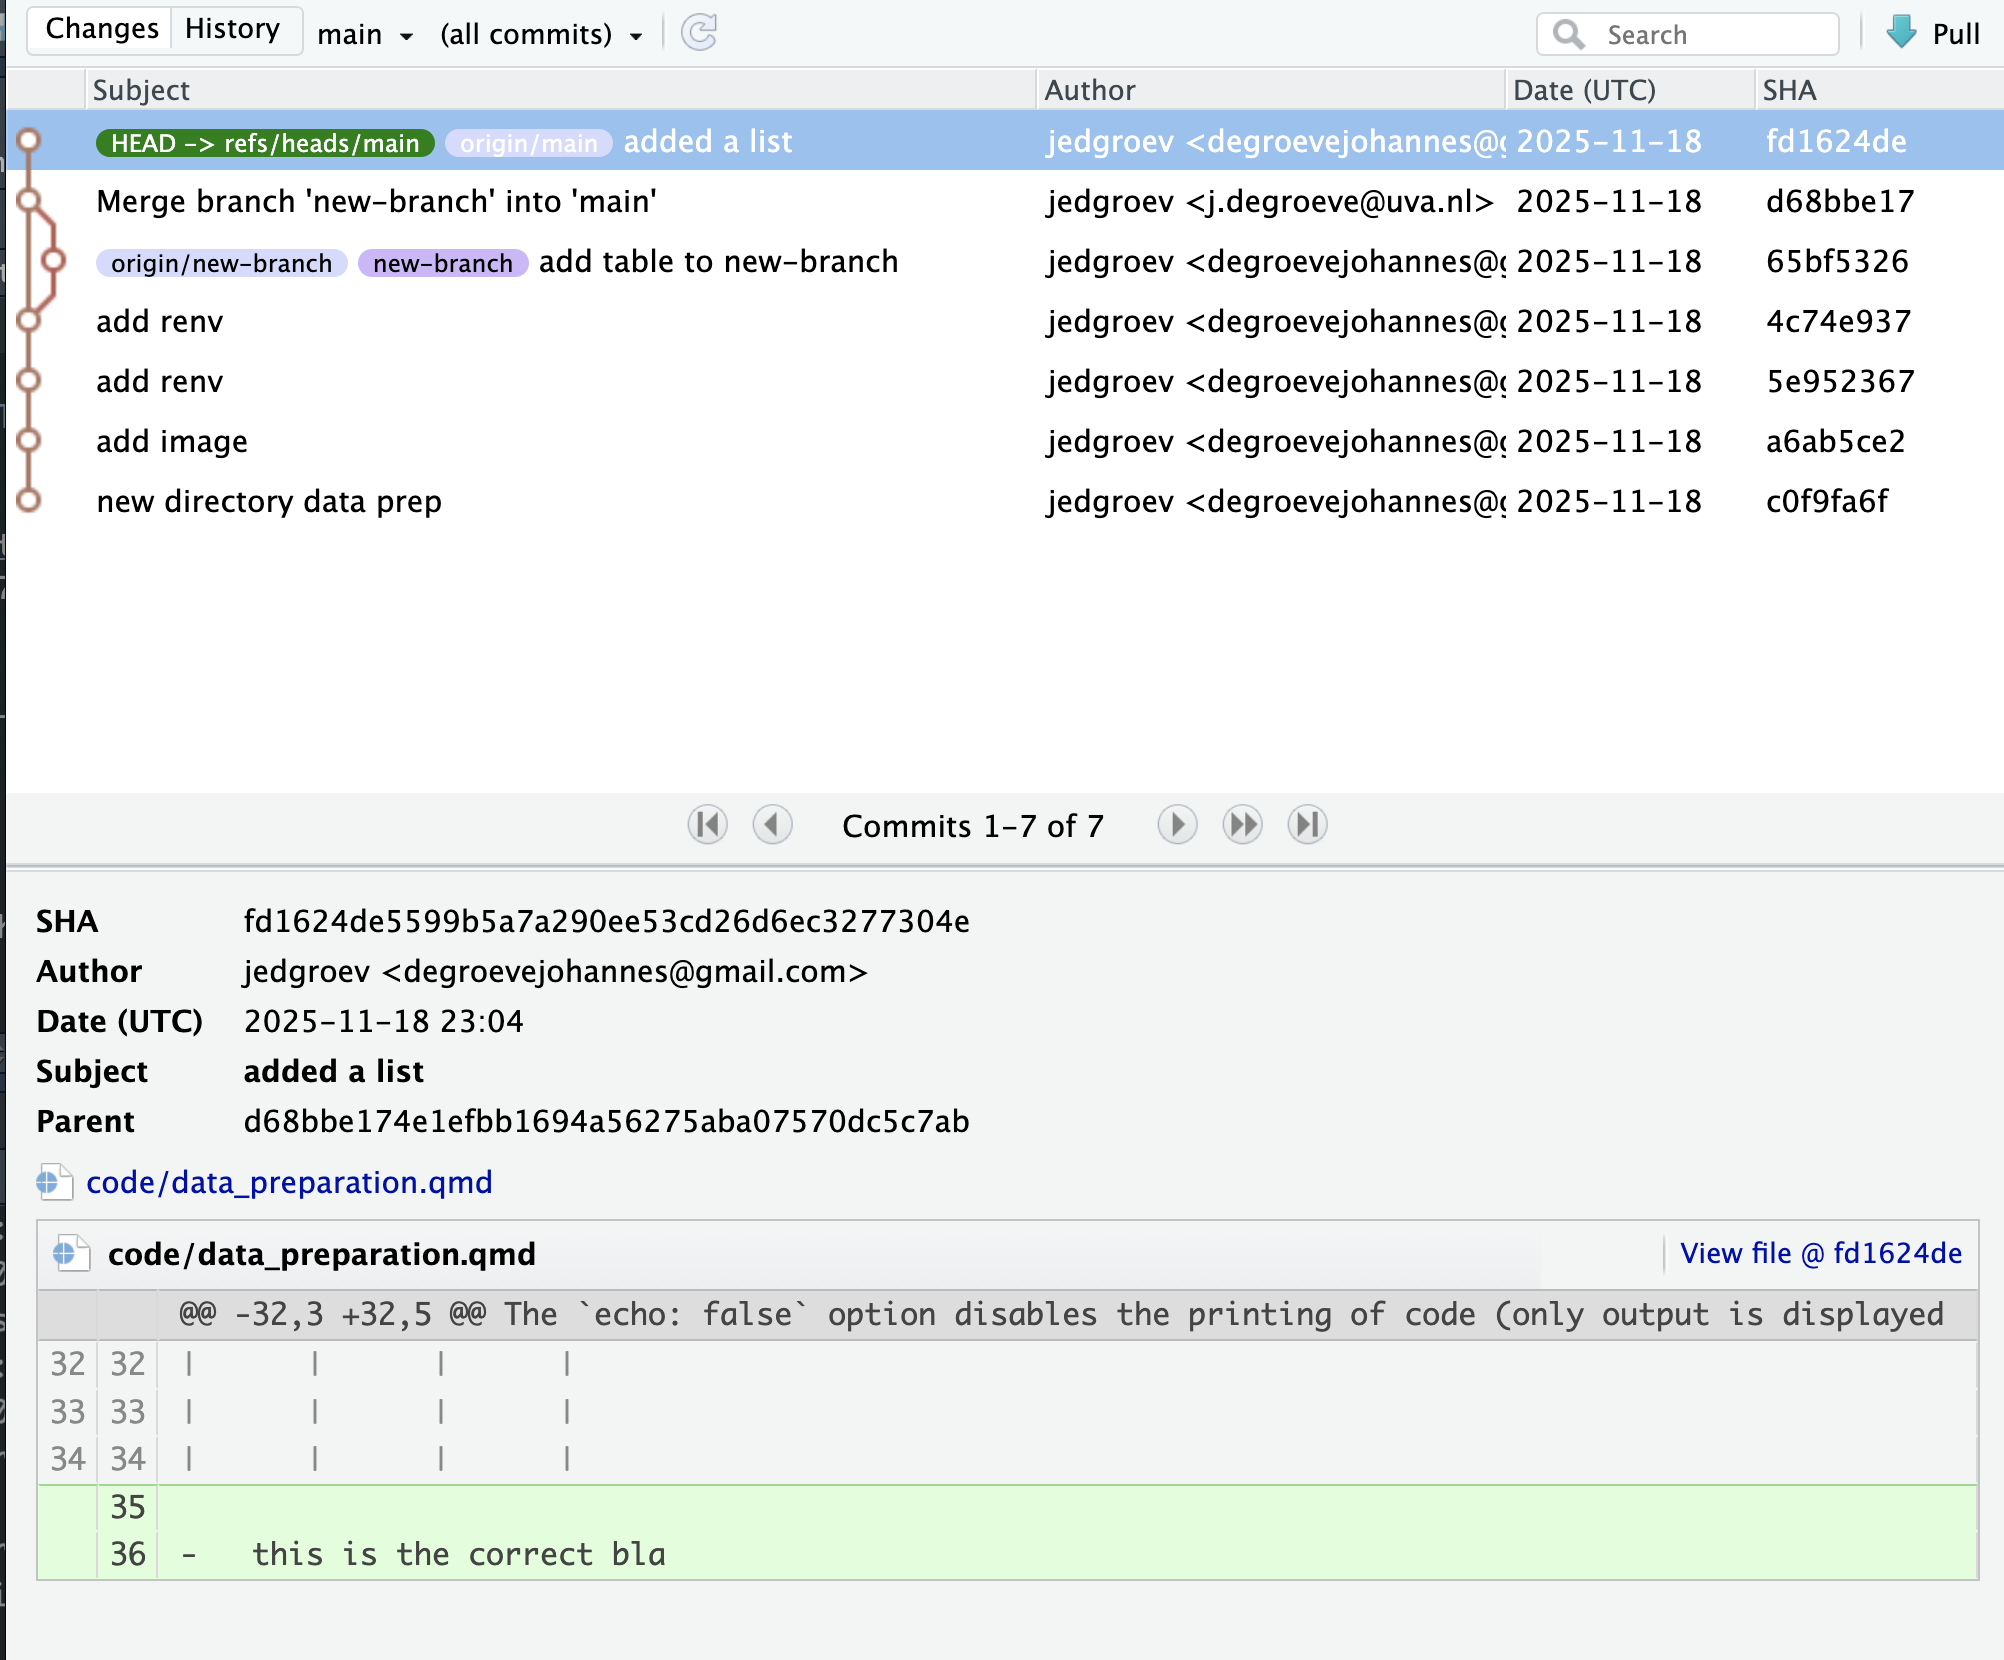
From the history view, you can inspect:
- Added lines (green)
- Removed lines (red)
- Commit messages
- Who made the change
- When it happened
Check out an old version
If you need to revisit a previous state of the project:
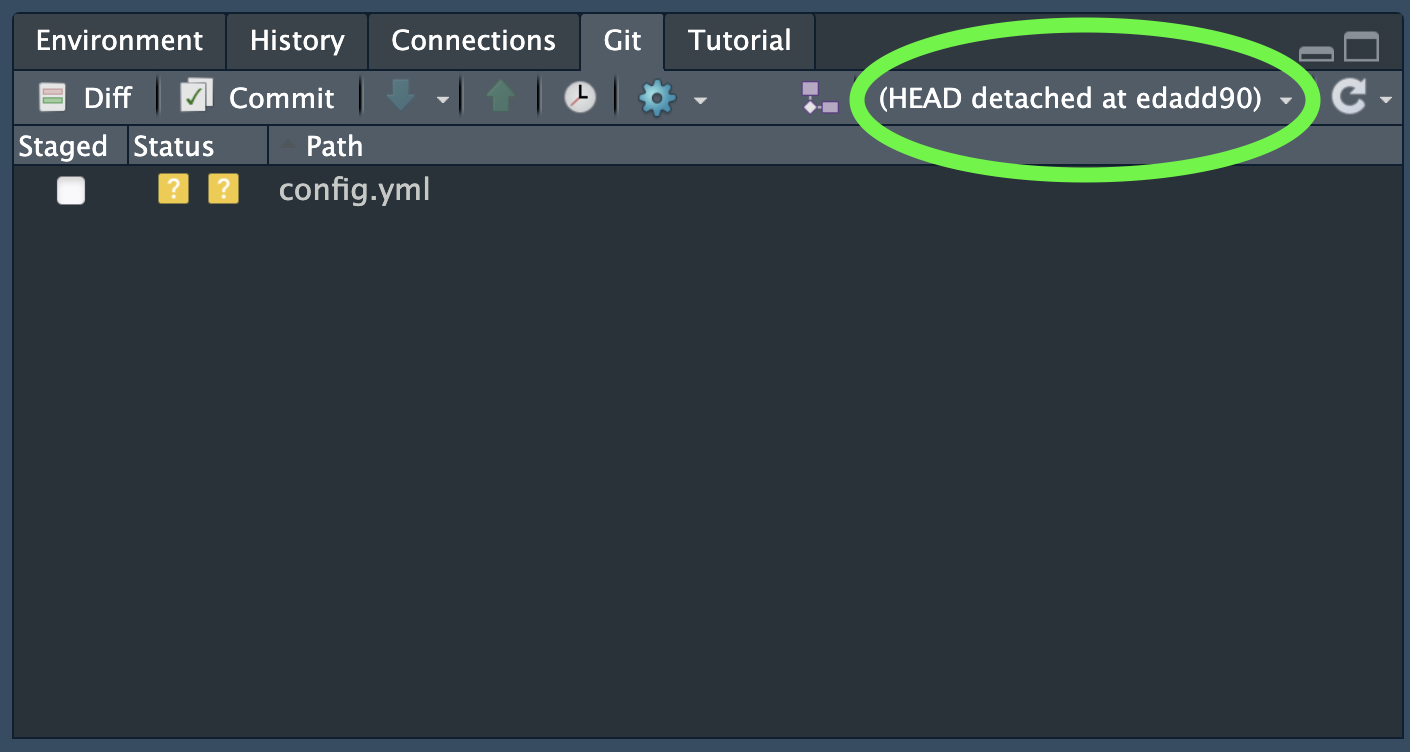
git checkout <commit-hash>This lets you explore the repo as it was at that moment. You can run code and inspect files. This puts you in a “detached HEAD” state, a temporary view.
To return to normal:
git checkout mainDownloading an old version (GitHub / GitLab)
On GitHub / GitLab:
1. Go to Commits
2. Click the desired commit
3. Choose Browse files at that commit
4. Click Download ZIP
This makes retrieving old versions extremely accessible without any command-line knowledge.
Exercise 6: Explore history
- Open Git → History in RStudio.
- Pick a past commit.
- Inspect its differences.
- Find which lines changed.
Goal: Understand change tracking and how to view it in RStudio
Exercise 7: Check out older versions
- Copy a commit hash from the history.
- Run:
git checkout <hash>- Inspect the project at that moment.
- Return to main:
git checkout mainGoal: Learn to navigate past states.
9. Tags & Releases
Tags (Marking important versions)
Tags are labels you attach to specific commits. They are perfect for marking an important status of the repository. Between two important versions there might be a lot of intermediate small commits. With tags you could mark the more important changes. A tag can be created in Github / Gitlab or from the terminal.
git tag -a v1.0.0 -m "First stable version"
git push origin v1.0.0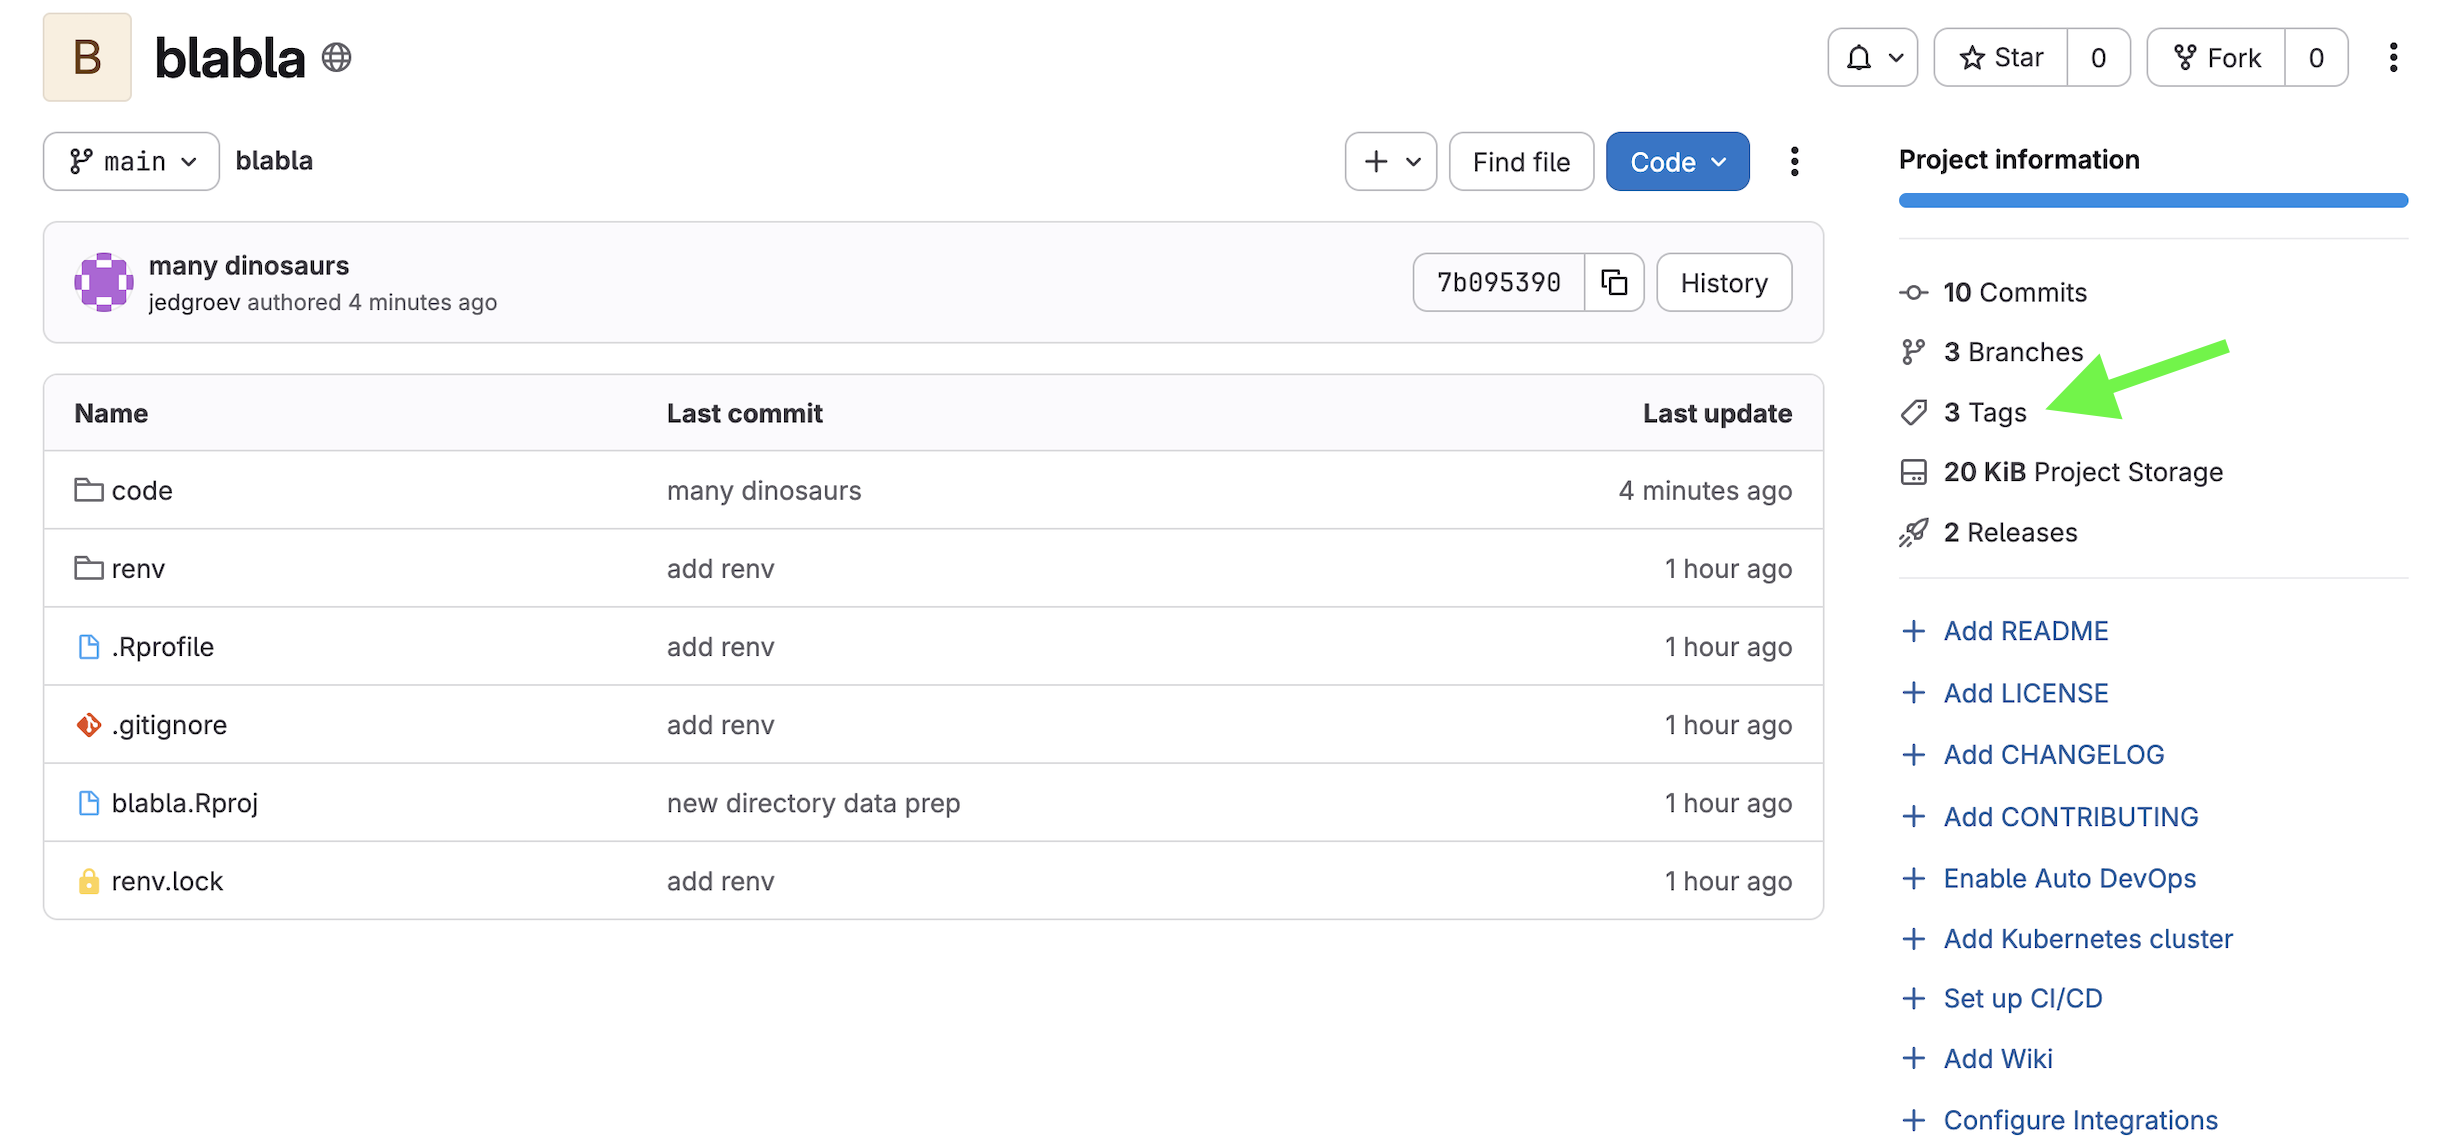
→ Terminal equivalent: §14.5 Tags
Releases (Tags + Documentation)
GitHub / GitLab lets you turn tags into releases, adding version notes and a clearer, more official way to share a version with the community. Releases are used for automatic archiving to Zenodo or Figshare.
Exercise 8: Create a tag and release
- create a tag
git tag -a v0.1.0 -m "Initial milestone"
git push origin v0.1.0- Explore in github
- Turn a tag into a release
Goal: Familiarize with marking important project versions and releasing an official version.
10. Daily Workflow
If you make changes directly in the remote (GitHub / GitLab web editor), make sure to pull before editing locally.
11. Branches
What Is a Branch?
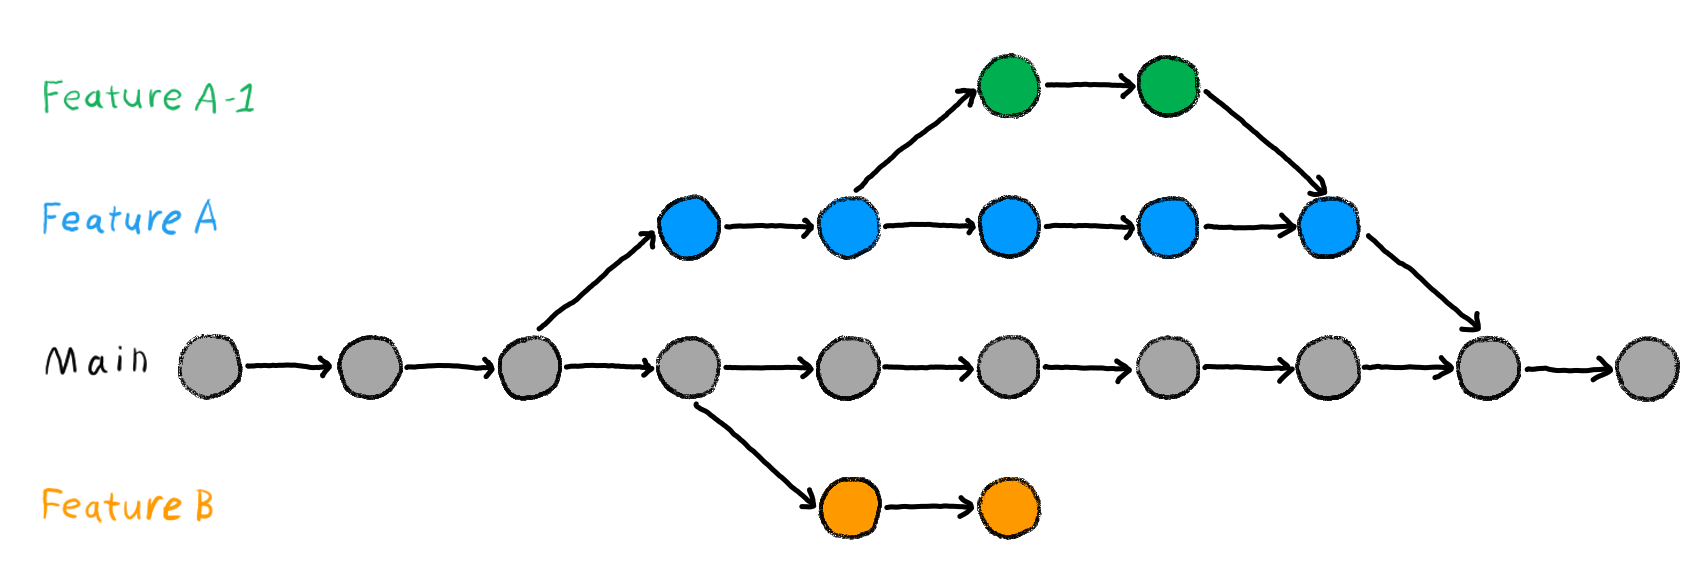
Think of your project as a timeline of commits on the main branch. When you create a branch, you are spinning off a copy of that timeline where you can work freely, without touching the stable main code. Once you are happy with your changes, you merge the branch back into main.
Use branches for new features or analyses you are not sure about yet, experiments, bug fixes (issues), or collaborating without overwriting each other’s work.
Creating and Switching Branches in RStudio
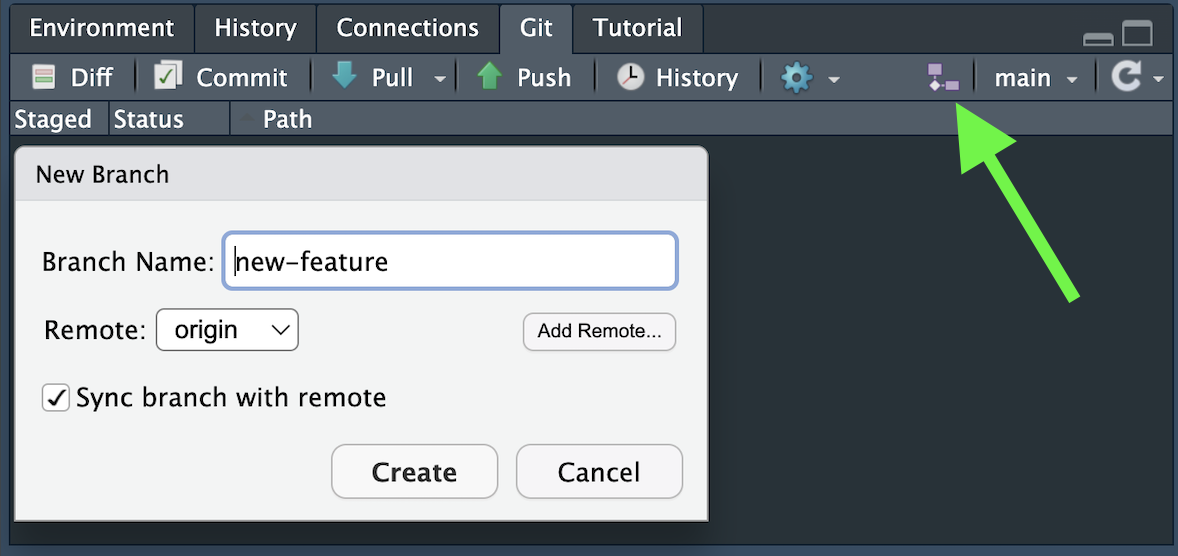
In the Git pane, click the branch icon (top-right), type a short descriptive name (e.g. new-feature), ensure Sync branch with remote is checked, and click Create. The current branch is always shown in the top-right of the Git pane.
Always commit or stash your changes before switching branches. Uncommitted changes can carry over or cause conflicts.
Merging a Branch
Once your work is ready, you could merge the branch back into main. The recommended way is via a Pull Request (GitHub) or Merge Request (GitLab):
- Push your branch.
- On GitHub / GitLab, you will see a prompt to open a Pull / Merge Request.
- Add a title and description explaining what changed and why.
- Invite a colleague to review if collaborating.
- Click Merge and remove the branch.
- Back in RStudio, switch to
mainand click Pull to get the merged changes locally. - In RStudio the branch that was merged may remain visible in the branches. To clean this branch run:
git fetch --prune
git branch -vv
git branch -d new-function-add_one
→ Terminal equivalent: §14.5 Branches
Exercise 9: Create and Merge a Branch
- In RStudio, create a new branch called
new-function-add_one. - On that branch, add a new directory
functionsin the codedirectoryand an R-scriptfunctions.R. - Copy the following function in the file
functions.R:
add_one <- function(x){
y <- x + 1
return(y)
}- Commit and push the changes.
- Go to GitHub / GitLab and open a Pull / Merge Request.
- Merge the branch into
mainand remove the branchnew-function-add_one. - Back in RStudio, switch to
mainand pull to confirm the changes arrived. - Also make sure the branch
new-function-add_oneis removed from the branch panel.
Goal: Understand isolated development and the full branch → merge cycle.
Merge Conflicts
A merge conflict happens when the same line was changed differently on two branches that you are trying to merge. Git cannot decide which version to keep, so it asks you to resolve it manually.
What conflict markers look like:
<<<<<<< HEAD
This is the version on main.
=======
This is the version on my branch.
>>>>>>> new-feature
Resolving a conflict:
- After doing a pull request in github for two conflicting branches github will notify you.
- Find the
<<<<<<<,=======, and>>>>>>>markers. - Decide which version to keep (or write a new version combining both).
Conflicts are less common if you keep branches short-lived and merge often. The longer a branch lives without syncing with main, the more likely conflicts occur.
Exercise 10: Merge Conflict
- Create a new branch
conflict-test. - On
main, change the function name to add_two and 1 to 2 and commit changes:
add_two <- function(x){
y <- x + 2
return(y)
}- on the
conflict-testbranch change the same function but change 1 to 3 and commit changes:
add_one <- function(x){
y <- x + 3
return(y)
}- In GitHub make a pull request and merge
conflict-testintomain. - Observe the conflict markers in the file and resolve.
Goal: See conflict markers and learn how to resolve them.
→ Terminal equivalent: §14.5 Branches
12. Managing Large Datasets
The Problem with Large Files in Git
Git is designed for text files and small data files. When you add large binary files to a repository, several problems arise:
- The repository grows very large and slow to clone
- Every commit retains a full copy of binary files, even unchanged ones
- GitHub enforces a hard limit of 100 MB per file, and recommends staying under 50 MB
There are three strategies for handling large files.
.gitignore: exclude files entirely (option 1)
The simplest solution is to exclude large files from git using .gitignore. This is appropriate when the data is also stored and backed up elsewhere.
Files listed in .gitignore are not tracked at all. There is no history of changes to them, and they are not shared with collaborators via the repository.
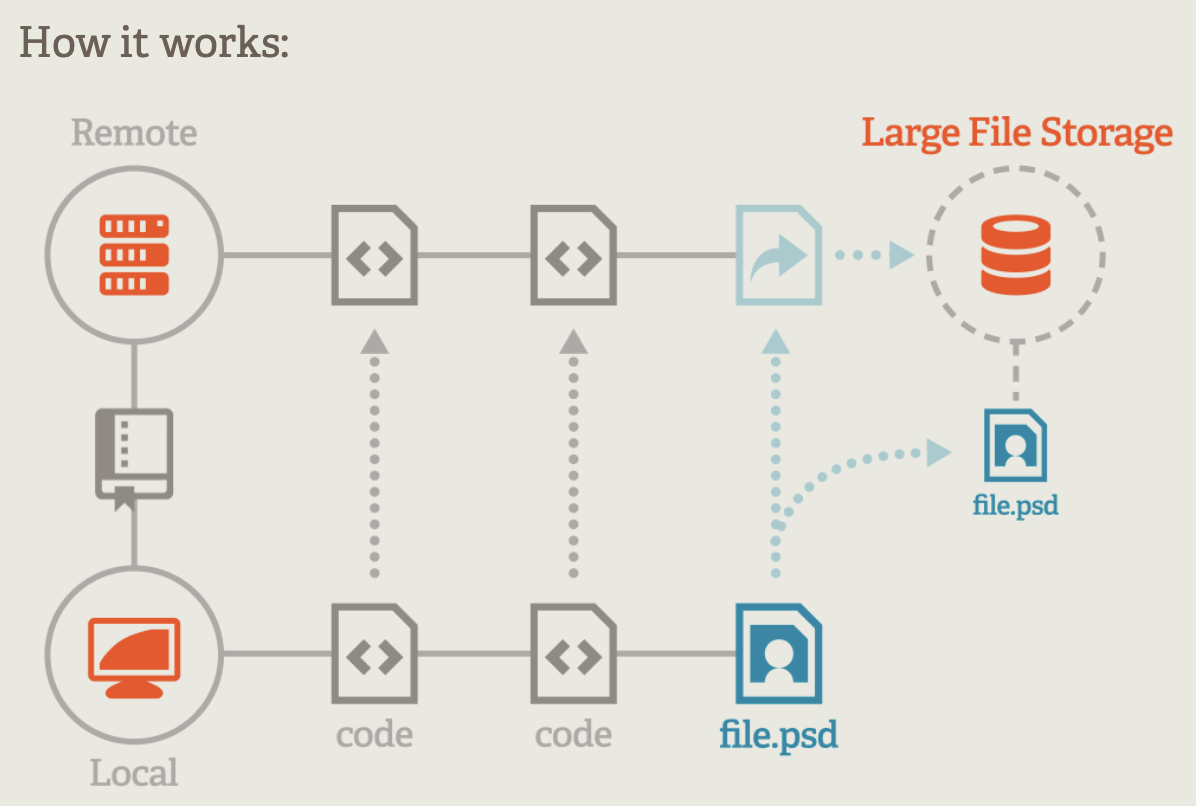
Git LFS: version large files (option 2)
Git Large File Storage (LFS) is an extension that keeps large files out of the repository history while still allowing you to version them. Instead of storing the file directly in git, it stores a small text pointer, while the actual file lives on the remote server (GitHub / GitLab).
Use Git LFS when you want to track versions of large files, for instance html files rendered from markdown, without bloating the repository.
Setting up Git LFS
Step 1 — Install LFS (once per machine, download from git-lfs.com):
git lfs installStep 2 — Track file types (once per repository):
git lfs track "*.html"This creates / updates a .gitattributes file in your repository:
*.html filter=lfs diff=lfs merge=lfs -textStep 3 — Commit .gitattributes and proceed as normal:
git add .gitattributes
git commit -m "Set up Git LFS for website content"
From this point on, git add, git commit, and git push work exactly as before — LFS handles the large files transparently.
Storage limits: GitHub free accounts include 1 GB of LFS storage and 1 GB/month bandwidth. GitLab free accounts include 5 GB LFS storage. For larger needs, institutional or paid plans apply.
External storage (option 3)
For very large, continuously growing, or highly structured datasets that cannot be managed on your personal computer the best approach is to keep the data completely outside the repository (see table). In this case your git project repository will host the code and queries how to access the datasets and possible sample datasets.
| Storage type | Examples |
|---|---|
| cloud storage | Nextcloud (research drive), AWS S3 |
| Relational databases | PostgreSQL, MySQL, SQLite |
| Tape storage | SURF Archive |
| External hard drives | Secundary Backup |
Real-world example: Birdradar
Radar continuously monitors and tracks the presence of birds. This generates large datasets including stored in a relational PostgreSQL database. The git repository contains the SQL queries used to extract and filter the data, along with the R scripts for analysis.
# This query script IS in git — the data it retrieves is NOT
dbname <- 'database1'
db1 <- config::get(dbname)
con <- DBI::dbConnect(
  RPostgres::Postgres(),
  host     = db1$host,      # stored in .Renviron
  dbname   = dbname,
  user     = db1$uid,
  password = db1$pwd
)

radar_data <- DBI::dbGetQuery(con, "
  SELECT track_id, classification_id, timestamp_start, timestamp_end, trajectory
  FROM tracks
  WHERE timestamp_start BETWEEN '2024-08-01' AND '2024-08-31'
")
13. Hosting a Website with Quarto + GitHub Pages
GitHub Pages lets you host a free, public website directly from a GitHub repository. Combined with Quarto it allows you to deploy a website within 5 minutes.
Exercise 11: hosting a website on github with quarto
- Create a git repository online
- Clone the remote repository (← See §5)
- In Rstudio: New Project > New Directory > Quarto Website > Create Project
- Navigate to the created Quarto Website Project Directory and copy-paste all content in the cloned git repository, which will host your website
- Open
_quarto.ymland add the output-directory where the site will be rendered
project:
  type: website
output-dir: docs- Open
about.qmdand click render (this will generate the website in a directory named docs) - Commit all changes (your website is online)
- In github, in your repository, navigate to settings > pages. Specify the website branch (main) and the folder in which the website is stored.
- Navigate to
https://<USERNAME>.github.io/<REPOSITORY-NAME>
14. Using Git Programmatically (Terminal)
Everything covered in this tutorial can also be done via the Terminal (or RStudio’s built-in Terminal tab: Tools → Terminal → New Terminal). This is useful when you want to automate steps, work on a remote server, or simply prefer the command line.
Below is a complete reference that mirrors the RStudio workflow sections above.
14.1 Creating / Cloning a Repository
New local repo
# creates a new git repo in ./my-project
git init <my-project>
cd <my-project>
Clone an existing remote repo
git clone https://github.com/<user>/<repo-name>.git
cd <repo-name>
14.2 Basic Workflow: Pull → Stage → Commit → Push
Pull
Download latest changes from the remote (Section 6):
git pullStage
Select which files to include in the next commit (Section 6):
git status           # see which files changed
git add <filename>.R # stage a specific file
git add .            # stage all changed files
git diff --staged    # inspect staged changes before committing
Commit
Save a snapshot with a message (Section 6):
git commit -m "Add species count analysis"Push
Upload commits to the remote (Section 6):
git push
# First push on a new branch:
git push -u origin main14.3 Version History
View commit history (Section 8):
git log --oneline            # compact one-line view
git log --oneline --graph # with branch graphCheck out an old version (Section 8):
git checkout <commit-hash>   # enter detached HEAD state
git checkout main # return to normal14.5 Branches
← RStudio version: §11 Branches
Create a new branch and switch to it (Section 11):
git checkout -b new-feature
# also push it to the remote immediately:
git push -u origin new-feature
Switch between branches (Section 11):
git checkout main
git checkout new-feature
Merge a branch into main (Section 11):
git checkout main
git merge new-feature
git push
Delete a branch after merging:
git branch -d new-feature             # local
git push origin --delete new-feature  # remote
Resolve a merge conflict (Section 11): open the file, remove the conflict markers, then:
git add conflicted-file.R
git commit -m "Resolve merge conflict in conflicted-file.R"
git push
14.7 Quick Reference Card
| Action | Command |
|---|---|
| Clone repo | git clone <url> |
| Pull latest changes | git pull |
| Check status | git status |
| Stage a file | git add <file> |
| Stage everything | git add . |
| Commit | git commit -m "message" |
| Push | git push |
| Create branch | git checkout -b <name> |
| Switch branch | git checkout <name> |
| Merge branch | git merge <name> |
| View history | git log --oneline |
| Create tag | git tag -a v1.0.0 -m "msg" |
| Push tag | git push origin v1.0.0 |
| Set up LFS | git lfs install |
| Track type with LFS | git lfs track "*.tif" |